Water can sit in your flooring like a hidden weight, spreading damage before you notice. You need to stop the source, clear standing water fast, and remove wet materials that hold moisture. Then set up structural drying equipment, direct airflow across walls and framing, and track moisture levels daily. If you keep humidity under control now, you can limit structural loss and reduce mold risk—but the next steps matter just as much.
Key Takeaways
- Shut off the water source immediately and contact a plumber or utility provider if the main valve is unreachable.
- Remove standing water fast using pumps or wet vacuums, then check cabinets, baseboards, and wall cavities for hidden moisture.
- Remove saturated drywall, insulation, and carpet pads so air can reach wet framing and subfloors.
- Set up air movers and dehumidifiers to target affected areas, and monitor moisture, temperature, and humidity daily.
- Prevent mold by keeping humidity below 60%, using moisture meters, and replacing materials that cannot dry completely.
Stop the Water at the Source
First, shut off the water at the source as quickly as you can. You protect your structure, your team, and your peace of mind when you act immediately.
If you can safely reach the main valve, turn it off; if not, call a licensed plumber or your utility provider for help.
Use leak detection methods to identify the break, whether it’s a burst pipe, failed appliance line, or roof intrusion.
Once the flow stops, document the source and contact professionals for emergency repairs so you can limit further damage and support insurance claims.
Stay calm and communicate clearly with everyone on site.
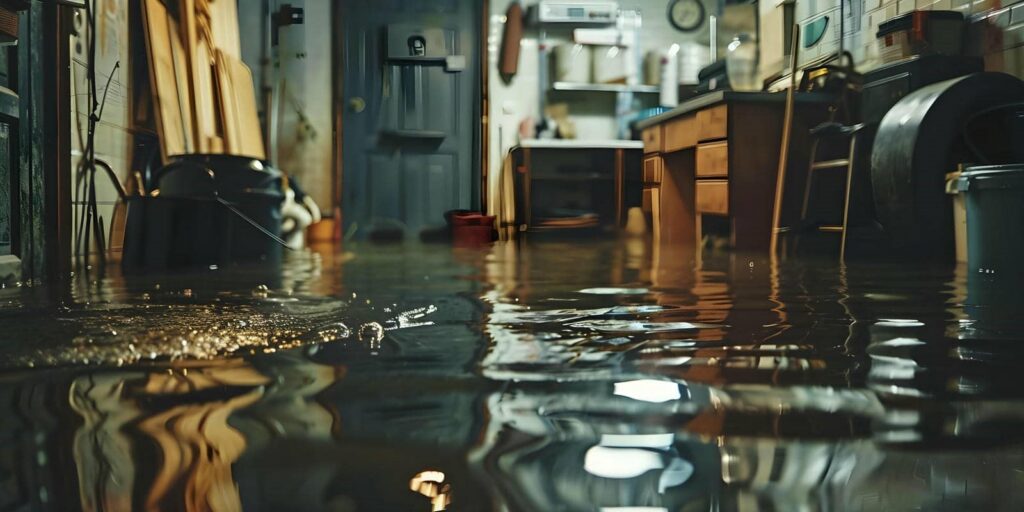
Remove Standing Water Quickly
You need to remove standing water immediately, because every minute increases absorption into framing, subfloors, and finishes.
Use pumps and wet vacuums to extract bulk water fast, then check for hidden pockets under cabinets, in wall cavities, and in low spots where moisture can remain.
Quick, thorough removal limits structural damage and helps you regain control of the drying process.
Speed Matters Immediately
The faster you remove standing water, the less damage it can do to structural materials and interior finishes.
In your emergency response, make a quick assessment first, then follow safety protocols before you enter saturated areas. You’ll protect your home and your household by identifying hazards, documenting conditions for damage evaluation, and noting insurance considerations early.
Fast action also supports a more accurate restoration timeline, because moisture spreads into subfloors, trim, and wall cavities within minutes.
When you act promptly, you’re not just limiting loss—you’re joining a clear, organized recovery process that helps you regain control.
Stay focused, stay methodical, and move water out as soon as it’s safe, so the structure can begin drying under better conditions.
Use Pumps And Vacuums
Once you’ve confirmed the area is safe, use pumps and wet/dry vacuums to remove standing water as quickly as possible.
Choose pump types based on depth and volume: submersible units handle deeper water, while utility pumps move moderate amounts fast. Position hoses to discharge away from the building so you don’t recycle moisture.
Then switch to a wet/dry vacuum for remaining surface water, keeping the nozzle in full contact with the floor to improve vacuum efficiency. Empty tanks often, inspect filters, and maintain suction.
You’re not tackling this alone; the right tools let you and your team regain control quickly. Work methodically, cover the full area, and keep equipment moving until visible water is gone and drying can begin confidently.
Clear Hidden Pockets
Check behind baseboards, under cabinets, inside wall cavities, and in low spots where water can hide after the visible pooling is gone.
You’ll need to remove hidden moisture fast, because trapped water in structural cavities can spread damage even when the surface looks dry.
Use inspection methods like probing, thermal checks, and water detection meters to confirm where dampness remains.
Open moisture barriers carefully, lift drying materials, and create strong air flow so evaporation starts immediately.
Apply targeted drying techniques to framing, subfloors, and voids, and keep checking construction concerns such as swollen trim or softened drywall.
Remove Materials That Trap Moisture
Pull out saturated carpet pads, wet insulation, damaged drywall, and any other porous materials that hold water after the initial leak or flood. You’ll prevent hidden reservoirs from feeding mold and swelling.
Remove baseboards, underlayment, and trim only when they’re soaked or warped, and check cavities behind them for trapped moisture. If materials sit against moisture barriers, separate them so air can’t stay locked in.
Bag absorbent materials promptly and move them outside the wet zone to limit spread. You’re not stripping the structure; you’re making the space recoverable for everyone in the home.
Work methodically, label salvageable pieces, and keep unsalvageable items apart from clean contents. That clarity helps your team stay coordinated and confident during the first critical hours.
Set Up Structural Drying Equipment
Position your air movers and dehumidifiers to target wet surfaces directly, keeping intake and discharge paths clear for efficient coverage.
You’ll want steady airflow across the affected materials without creating dead zones or blowing moisture into untouched areas.
Monitor moisture readings, temperature, and relative humidity regularly so you can adjust the setup and track drying progress with confidence.
Equipment Placement Strategy
When you set up structural drying equipment, place each unit to support balanced airflow across the affected area and to minimize dead zones where moisture can linger.
Match equipment types to the material profile, then use placement techniques that keep dehumidifiers, air movers, and injectors in coordinated positions. You’ll do best when you keep units clear of walls, corners, and obstructions, while maintaining safe access for monitoring and adjustments.
Group equipment so each zone receives consistent treatment, and verify that cords, hoses, and drains stay organized.
Trust the layout you choose: a disciplined setup helps your team work efficiently, protects the structure, and gives everyone confidence that the drying plan is under control.
Airflow And Circulation
Once you’ve placed the equipment, focus on creating steady airflow that moves moisture away from wet materials and keeps air from stalling in corners, behind furnishings, or along low spots.
You’ll improve airflow patterns by aiming fans across surfaces, not directly at them, and by pairing dehumidifiers with strategic fan placement. These circulation techniques support humidity control and speed moisture management without stressing the structure.
Use ventilation methods that exchange damp indoor air when conditions allow, and keep air movement uniform from room to room.
Position drying agents so they complement, not block, the flow path. When you maintain balanced circulation, you protect structural integrity, reduce trapped moisture, and improve drying efficiency.
You’re not just moving air—you’re helping the space recover as one coordinated system.
Monitoring Drying Progress
As drying begins, monitor moisture levels regularly so you can confirm the equipment is working as intended and adjust it before problems slow the process.
Use moisture measurement tools on framing, subfloors, and wall cavities at the same times each day, and record results so you can spot steady declines.
Compare readings against unaffected materials nearby to verify progress. If numbers stall, refine your drying techniques by increasing airflow, repositioning dehumidifiers, or isolating wet areas more effectively.
Check temperature and humidity too, because they shape evaporation and help you decide when to shift equipment.
Consistent tracking keeps you aligned with the drying plan and helps your crew work as one.
When readings approach normal ranges, you can confidently move toward final verification and restoration.
Dry Walls, Floors, and Framing
Drying walls, floors, and framing takes priority after the bulk of the water is removed because trapped moisture can weaken materials and promote mold growth.
You should open cavities, remove wet baseboards, and expose framing so air can reach hidden surfaces. Use drying agents and controlled airflow to speed evaporation without overheating materials.
If drywall repair isn’t possible, replace damaged sections and plan matching wall finishes later. For floors, compare flooring options with subfloor recovery in mind, and choose moisture barriers where needed.
Inspect insulation choices carefully; saturated insulation often needs removal. Apply proven framing techniques to keep members straight and stable while they dry.
When the damage is extensive, trusted restoration services can help your team restore the space safely and confidently.
Check Moisture Levels as You Dry
While walls, floors, and framing continue to dry, you need to verify moisture levels instead of relying on appearance alone. Use moisture meters to compare affected materials with unaffected areas, so you can track real progress.
Take readings at the same locations each day, and log them to spot trends. If one section stalls, adjust your drying techniques by increasing airflow, repositioning dehumidifiers, or exposing hidden surfaces. You’ll make better decisions when you measure consistently, and your crew can stay aligned on what’s actually drying.
Don’t assume a surface is safe just because it feels dry; materials can hold moisture inside. When readings move steadily toward baseline, you know your emergency structural drying plan is working and your space is getting back on track.
Prevent Mold After Drying
Once moisture levels drop, you need to keep materials from staying damp long enough for mold to develop. Move air across hidden cavities, remove wet insulation, and verify that wood, drywall, and framing reach safe dry standards.
You should inspect corners, baseboards, and subfloors with a moisture meter, then document readings so you can spot rebound quickly. Use preventive measures like dehumidification, filtration, and fast debris removal to reduce spores and lingering humidity.
Seal clean, dry surfaces only after they’re stable, and replace porous items that can’t dry fully. For reliable mold prevention, keep the area ventilated, maintain indoor humidity below 60%, and return regularly for follow-up checks.
You’re not managing this alone; each careful step helps protect your home and everyone in it.
Frequently Asked Questions
Can I Dry Water-Damaged Areas Without Professional Equipment?
Yes, you can dry small areas yourself using DIY drying techniques and a careful home moisture assessment. You’ll need fans, dehumidifiers, and ventilation, but if moisture persists or materials feel soft, call a pro.
How Long Does Structural Drying Usually Take?
You’ll usually see structural drying take 3-5 days, though your drying time depends on saturation, materials, and drying techniques. You’re not alone—monitor moisture daily, adjust airflow, and keep conditions stable for reliable results.
Should I File Insurance Claims Before Cleanup Starts?
Yes, you should usually file your insurance claim before cleanup starts. You’ll protect coverage, document damage accurately, and keep the claim process smooth. Check your insurance policy first, then begin mitigation quickly with confidence.
What Safety Gear Is Needed During Water Damage Cleanup?
You need personal protective gear: gloves, boots, goggles, and an N95 respirator. You’ll protect skin, lungs, and eyes, support mold prevention, and work confidently while staying safe with contaminated water and debris.
When Should Electrical Systems Be Inspected After Flooding?
You should inspect electrical systems immediately after floodwaters recede, before you restore power. Prioritize electrical safety during flood recovery, and have a licensed electrician test outlets, wiring, panels, and appliances before you reenergize anything.
Wrap-Up
When you stop the flood at the gate, you take back control. When you clear the pools, you keep damage from sinking deeper. When you strip away soaked materials, you let the hidden chambers breathe. When you set the dryers and check the readings, you guide the house back to balance. Keep the humidity low, stay watchful, and you’ll close the door on mold before it can take root.