When water damage hits, it can spread like a silent tide through your home. You need to stop the leak, cut power to the wet area, and remove water fast with the right equipment. Then you must dry carpets, floors, walls, and hidden spaces before mold takes hold. The process looks simple at first, but the critical details are where most people slip.
Key Takeaways
- Stop the leak and shut off power if water has reached outlets, wiring, or appliances.
- Remove standing water quickly using a wet-dry vacuum, pump, or buckets, starting from the lowest area.
- Dry carpets, floors, and walls with fans, dehumidifiers, and lifted carpet edges to prevent trapped moisture.
- Check for hidden moisture, mold, swelling, and warped materials using moisture meters and humidity readings.
- Call a water damage professional for severe flooding, contaminated water, or any suspected electrical hazard.
Stop the Leak First
Before you start removing water, you need to stop the source of the leak immediately. Inspect visible leak sources such as supply lines, appliance hoses, roof penetrations, and cracked fittings, then trace moisture back to the origin.
If you can shut a valve or tighten a connection, do it right away. When the problem is bigger, use temporary repair methods like pipe clamps, waterproof tape, or a sealant patch to limit flow until a permanent fix is possible.
Document the damage so you can match the repair to the failure point. You’re not handling this alone; careful source control helps protect your space, your tools, and the people who share it with you.
Once the leak stops, you can move on with confidence and control.
Turn Off Power and Stay Safe
Once you’ve stopped the leak, cut power to the affected area at the breaker box if there’s any chance water has reached outlets, appliances, or wiring.
Treat every wet circuit as energized until you verify it’s de-energized. If you can’t reach the panel without crossing standing water, stay back and call a licensed electrician or your utility.
Use dry hands, rubber-soled shoes, and a flashlight, not candles. Keep family members and pets out of the space, and post clear warnings so no one restores power early.
Check for sparks, buzzing, warmth, or tripped breakers, which signal electrical hazards. These safety precautions protect you and your household while you wait for a qualified inspection.
Together, you’ll reduce risk and keep the cleanup controlled.
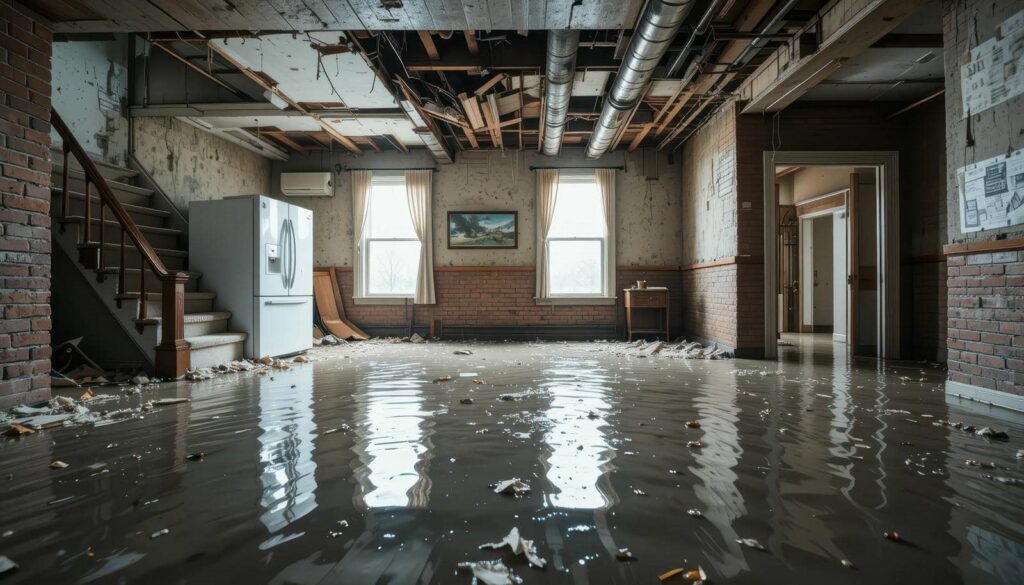
Remove Standing Water Fast
With the area safe and power off, get the standing water out as quickly as you can. Start your emergency response by using a wet-dry vacuum, submersible pump, or bucket brigade, depending on depth and access.
Work from the lowest point toward exits so you don’t trap water behind you. If the source is still active, shut off supply valves before you continue.
Use water removal techniques that match the volume: pumps for deep water, vacuums for shallow pools, and mops for thin films. Empty equipment often, and keep hoses directed outside.
Move methodically, checking corners, closets, and under furniture. You’re not alone in this; follow the same steps your crew would use to regain control fast, limit spread, and prepare the space for the next phase.
Dry Water-Damaged Carpets and Floors
After you’ve removed standing water, start drying carpets and floors immediately to prevent mold, swelling, and structural damage.
Lift carpet edges, run air movers across the surface, and place dehumidifiers in the room to pull moisture from fibers and subfloors. If carpet padding stays saturated, you’ll need carpet cleaning and possible replacement to stop odor and contamination.
For hard surfaces, keep airflow steady and wipe up surface moisture with clean towels so floor restoration can proceed without trapped water.
Check for cool, damp spots with your hand or a moisture meter, and keep equipment running until readings normalize.
Stay organized, document progress, and work with your cleanup team so you can protect your home and move forward with confidence together.
Dry Walls and Hidden Spaces
Next, dry the walls and hidden spaces as quickly as possible, because moisture trapped in cavities can lead to mold, warped framing, and insulation failure.
You should inspect baseboards, outlets, trim joints, and wall bottoms for swelling or discoloration. Use moisture detection to confirm which sections still hold water, then mark them for targeted drying and drywall repair. Open access points only where needed so you don’t spread damage.
- Check behind cabinets and along plumbing walls.
- Remove wet insulation if it can’t be restored safely.
- Document readings so your team can track progress.
When you work methodically, you protect the structure and your household’s comfort.
Stay consistent, and you’ll restore the wall assembly with fewer surprises and a stronger sense of control.
Use Fans and Dehumidifiers
Position fans to move air across wet surfaces and set dehumidifiers to pull moisture from the room as quickly as possible.
For effective fan placement, aim airflow along walls, floors, and open cavities, not straight at one spot. Keep doors open when possible to improve air circulation and speed moisture control.
Adjust dehumidifier settings to match room size and current humidity levels; check the reservoir or drain line so it runs continuously.
These drying techniques work best when you monitor progress every few hours.
Clean filters, inspect cords, and perform equipment maintenance to protect performance and energy efficiency.
You’re not alone in this process; using the right tools and settings helps your space dry faster, more evenly, and with less stress.
Check for Mold and Hidden Damage
Check for mold growth by looking for discoloration, musty odors, and any soft or damp surfaces.
Inspect walls for hidden damage such as swelling, bubbling paint, or warped drywall, since moisture can spread behind the surface.
Examine flooring closely for cupping, lifting, or loose seams so you can catch structural damage early.
Mold Growth Signs
How do you know if water damage has already turned into a mold problem? You inspect for visible colonies, musty odor, and recurring dampness, then act fast. Measure indoor humidity; keep it below 60% with ventilation and dehumidifiers. These mold prevention tips help you stay ahead of the spread and protect your space.
Look for discoloration on drywall, trim, or fabric.
Smell for a stale, earthy odor after drying.
Watch for allergy-like symptoms that improve elsewhere.
If you notice any of these signs, your home isn’t failing you—you’re catching an issue early.
Dry materials completely, clean affected surfaces with appropriate products, and remove porous items that hold moisture. The sooner you respond, the easier it’s to keep your environment healthy and your household comfortable.
Hidden Wall Damage
Even when surfaces look dry, hidden wall damage can trap moisture behind drywall, insulation, and trim. You need to check wall cavities for hidden leaks, because plumbing problems often spread before you notice stains.
Use moisture detection tools to compare readings around drywall concerns, base plates, and seams. If the values stay elevated, you may have insulation issues or trapped dampness that supports mold. Open small inspection points only where needed, then look for discoloration, soft material, and odor.
Improve airflow with ventilation solutions so the area dries faster and stays stable. Then apply restoration techniques that match the damage level, including removal, cleaning, and replacement of compromised materials.
Acting early helps you protect your space and keep the repair process under control.
Inspect Flooring Closely
When flooring has been exposed to water, you need to inspect it closely for warped boards, soft spots, loose seams, and mold growth at the surface and underneath.
Use floor inspection techniques to check edges, joints, and junctions where moisture hides. Lift a small section if needed, and smell for musty odors that signal hidden decay.
Apply flooring material considerations before you judge damage, because wood, laminate, vinyl, and tile fail differently.
- Press each area to find flexing or spongy sections.
- Probe seams and underlayment for discoloration, swelling, or residue.
- Document findings and separate salvageable material from contaminated material.
You’re protecting your home and your crew when you act fast and stay methodical.
Watch for Signs Moisture Remains
If moisture is still present, you’ll usually notice it before damage becomes visible. Use moisture detection tools to check damp zones in walls, trim, and subfloors, and compare readings across the room so you can spot lingering pockets.
Watch humidity levels with a hygrometer; if they stay elevated after drying, hidden water may remain. You should also feel for cool surfaces, look for musty odors, and inspect paint for bubbling or seams that separate.
Check baseboards, carpet edges, and under furniture, since these areas trap moisture. Keep air moving, but keep monitoring until readings stabilize.
When you catch these signs early, you protect your space, stay in control, and keep your home on the right track with your team.
When to Call a Water Damage Pro
Call a water damage pro if you suspect hidden moisture behind walls, under flooring, or in insulation, because standard drying can miss trapped water.
You should also get expert help if you see mold growth, warped materials, or softened structural components, since those issues can spread fast.
For severe flooding, contaminated water, or electrical hazards, stop cleanup and contact a specialist right away.
Hidden Moisture Risks
Even after visible water disappears, hidden moisture can remain trapped in drywall, subfloors, insulation, and wall cavities, where it can keep spreading damage and feed mold growth.
You can’t rely on surface dryness alone; use moisture detection tools, not guesswork. If readings stay elevated, you need a pro.
Check baseboards, outlets, and trim for cool spots or swelling.
Ask for thermal imaging and meter testing to confirm wet zones.
Call immediately when insulation issues or warped materials persist.
You’ll protect your home better when you act fast and stay connected to others who’ve handled the same problem.
A trained technician can locate concealed water, set drying targets, and prevent repeat repairs.
Don’t wait for visible signs.
Mold And Structural Damage
Mold can start growing quickly in damp materials, and once it takes hold, it can spread through drywall, insulation, framing, and flooring before you notice visible growth.
You need to treat that risk as both a health issue and a building problem. If you smell mustiness, see staining, or feel soft spots, inspect the area fast and remove wet materials you can safely access.
Dry surfaces thoroughly, but don’t assume the cavity behind them is dry. That’s where a pro helps protect structural integrity, verify hidden moisture, and prevent recurrence.
For mold prevention, you should control humidity, isolate the affected zone, and document what’s damaged.
When decay, sagging, or warped framing appears, call a water damage pro so your team can restore the space with confidence.
Severe Flooding Signs
When flooding is severe, you need to bring in a water damage pro right away if water has reached outlets, the electrical panel, HVAC equipment, or multiple rooms. You’re facing unsafe conditions that can spread fast through hidden cavities and subfloors.
If you smell damp insulation, hear buzzing, or see breaker trips, shut the power off and call for help.
If flooding sources include sewage, storm runoff, or a burst main, don’t try DIY drying; contamination needs professional extraction.
If emergency preparedness wasn’t enough to keep water out, document damage, protect access, and let the pro assess moisture mapping.
You’ll protect your home better by acting early, and you’ll fit in with neighbors who treat severe flooding as an urgent systems problem, not a cleanup project.
Frequently Asked Questions
How Long Does Water Damage Restoration Usually Take?
You’ll usually need 3–7 days, depending on damage size, material saturation, and drying equipment options. Professionals use water extraction techniques first, then monitor moisture daily, so you feel supported while ensuring complete structural drying.
Will My Insurance Cover Water Removal and Repairs?
Insurance coverage often acts like a safety net: you’ll likely get payment for water damage if your insurance policies include it, but coverage limits, deductible costs, and the claim process determine your restoration benefits.
Can I Stay in My Home During Cleanup?
You can stay home only if cleanup procedures keep your home safety intact. You’ll need dry, uncontaminated rooms, working utilities, and no structural damage. If you smell mold, see sewage, or lose power, leave immediately.
What Items Should Be Discarded After Water Damage?
You should discard soaked drywall, insulation, carpet pad, mattresses, and any warped wood that threatens structural integrity, plus food, medicines, and porous items showing mold growth. You’ll protect your space and belong safer.
How Do I Prevent Future Water Damage?
You prevent future water damage by inspecting seals, fixing leaks, improving grading, and installing drainage solutions. Use waterproofing techniques on foundations, roofs, and walls, and you’ll protect your space, strengthen your home, and feel confident.
Review
If you act within 24–48 hours, you can greatly reduce mold growth and structural damage after water intrusion. Stop the leak, shut off power, extract standing water, then dry every affected surface with airflow and dehumidification. Don’t trust dry-looking materials; use moisture detection to confirm hidden areas are dry. If you still smell mustiness, see staining, or suspect trapped moisture, call a water damage pro before the damage spreads further.